Part Number:
Number:
|
|
||||
| Product Part Number: |
Product Description: | Tech
Sheet Number: |
||
| 054-5695-050 | 9 5/8" MWBR Retrievable Bridge Plug,40.0-47.0# | 054-5695-050 | ||
| Operating Instructions | Assembly Instructions | Parts List/Drawing | ||
| Features/Description | Retrieving Procedure | |||
The MAP Model"MWBR" Wireline Set Retrievable Bridge Plug is a compact packer type bridge Plug that is set with a wireline pressure setting tool or hydraulic setting tools and retrieved by straight pull using tubing, coil tubing, sandline, or electric wireline. The plug is used for zone isolation, well Stimulation, or wellhead repair and can be lubricated in and out of the well under pressure, thus eliminating the need for killing the well.
The plug features a combined retrieving neck and equalizing valve located directly above a multiple element packing system. Caged, one piece slips are located below the packing and firmly anchor the plug against pressure differentials from above or below.
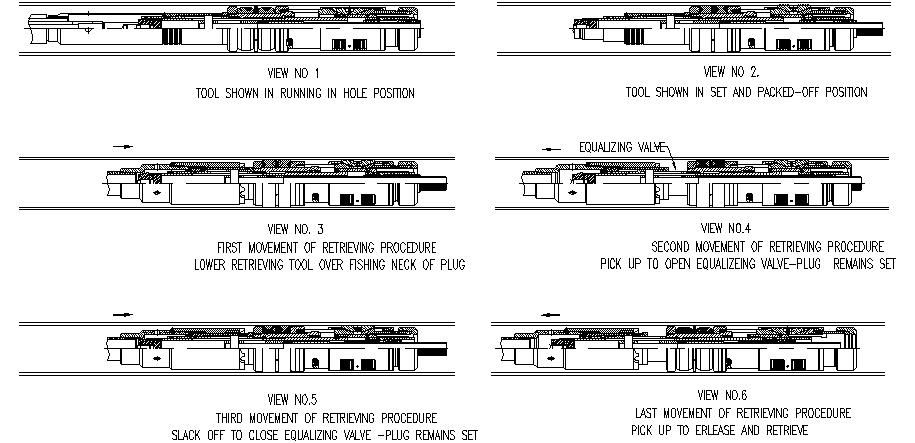
The plug is retrieved in the following sequence:
(a) Retrieving Tool ratchets onto retrieving neck of plug.
(b) Pick-up to open valve and equalize pressure (plug stays set).
(c) Set back down (Plug stays set).
(d) Pick up to release and retrieve.
Emergency release (retrieving with tubing): Hold slight upstrain while rotating tubing to right approximately 12-turns at the tool to disconnect the tubing retrieving tool from the bridge plug. Emergency release (retrieving with coil tubing, sandline, electric line): Shear out the safety joint of the sandline retrieving adapter that is screwed in top of the tubing retrieving tool. This will leave a secondary fishing neck attached to the plug to permit another retrieving attempt.
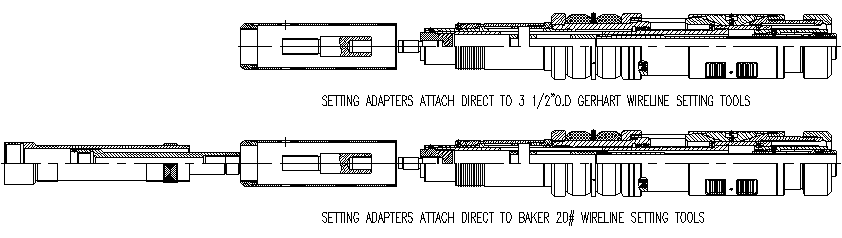
WIRELINE SETTING INSTRUCTIONS
The
MAP Model"MWBR"
wireline Set Retrievable Bridge Plugs
can be set with either Baker wireline pressure setting tools or Gearhart wireline
setting tools. The setting adapters-contain Baker adapter kits. Kit part numbers
are listed in the retainer specification outline. An adapter rod attached to
the setting tool and attached to a mild steel release stud located in the body
at the upper end of the bridge plug. A setting sleeve attached to the setting
tool . During setting, the sleeve holds the bridge plugs outside components
and the rod pulls the bridge plugs body up; this action sets the slips and packs
off the sealing element. The bridge plug, thus, is set by compression (instead
of tension on vital components). At a predetermined tension it releases stud
parts and allows the setting tool and adapters to be removed from the well.
|
Wireline
Setting Kits
|
||||
|
Gearhart Wireline Setting Tools
|
Setting
Sleeve
|
Adapter Rod
|
Wireline Setting Tool | |
| Baker |
Convert
Adapter Kit
|
|||
|
3 1/2"OD short
|
No.20 | |||
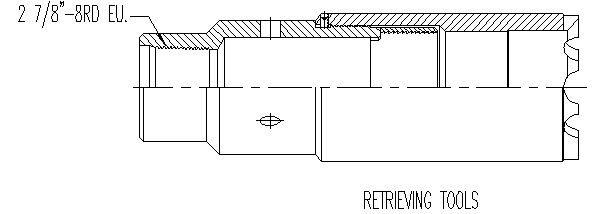
The MAP Model"MWBR" Wireline Set Retrievable Bridge Plug is retrieved by the various methods outlined below. Prior to attempting to retrieve the plug, any sand and debris must be reverse circulated off the top of the plug to allow the retrieving tool to latch onto the fishing neck.
Retrieving With Tubing
The MWBR Bridge Plug is retrieved by employing FOUR distinct movements:
1.LOWER RETRIEVING TOOL...
over the fishing neck of plug then slack off to ensure full engagement.
2.PICK UP TO OPEN EQUALIZING VALVE...
then allow adequate time for differential pressure to equalize across the plug. This is accomplished by shearing the brass shear screw (2,300 lbs. Approx. shear) in the fishing neck which allows the valve to open upward 2-1/2 inches. The plug remains set and will not release.
3.SLACK OFF TO FULLY RECLOSE THE VALVE...
The plug remains set and will not release.
4.PICK UP TO RELEASE AND RETRIEVE...
Release is accomplished by fully reopening the equalizing valve 2-1/2 inches. This action shears the lower brass shear screw (2,3O0 lbs. Approx. shear) that holds collet support under collet body fingers. Upward movement of the fishing neck will shift collet support upward, allowing collet body fingers to collapse and free the plug for retrieval.
After the plug is released,
move it up the hole approx. ten feet to stretch out the slip system and allow
the packing elements to retract. To determine if the plug is properly released,
slowly lower the tool below the setting location. The tool will not take weight
if properly released. Fluid will by-pass around and through the plug during
retrieval.
EMERGENCY RELEASE (if retrieving with tubing):
In the event the plug will not release (after having employed the four releasing movements), the tubing and tubing retrieving tool can be freed from the plug by holding approx. 1,000 lbs. upstrain while rotating right hand approx. twelve turns at the tool. Standard fishing operations with an overshot and tubing jars can now be used in attempts to retrieve the plug.
RETRIEVING WlTH COIL TUBING
Retrieving with coil tubing is same procedure as with conventional tubing except an appropriate Sandline Retrieving Adapter Assembly must be made up into top end of Tubing Retrieving Tool Assembly. The shear pinned safety joint of the Sandline Retrieving Adapter can be sheared out to free the coil tubing string in the event the bridge plug cannot be retrieved properly.
Retrieving WITH SANDLINE
Make up the appropriate size Sandline Retrieving Adapter Assembly into top end of Tubing Retrieving Tool Assembly. Attach to stem and jars with the jars positioned immediately above the Sandline Retrieving Adapter. Flag the line and run tools to setting depth. Retrieving is accomplished by using the same four distinct movements outlined for tubing retrieval, except jarring may be required to perform the necessary up and down movements.
EMERGENCY RELEASE (if retrieving with sandline):
In the event the plug will not release (after having employed the four releasing movements), the shear pinned safety joint of the Sandline Retrieving Adapter can be sheared out to free the stem and jars. After shear out, a secondary fishing neck will remain to allow further attempts at retrieving the bridge plug.
|
Specifications |
|||||||||||||
|
Casing |
Setting Range |
Bridge Plug Max. O.D
|
Setting Force (LBS)
|
Bridge Plug Redress kit
|
Tubing Retrieving Tool | ||||||||
|
OD |
WT |
Min ID |
Max ID |
||||||||||
|
9-5/8" |
40.0-47.0# |
8.681
|
8.835
|
8.437
|
48,000
|
054-5695-080 | |||||||
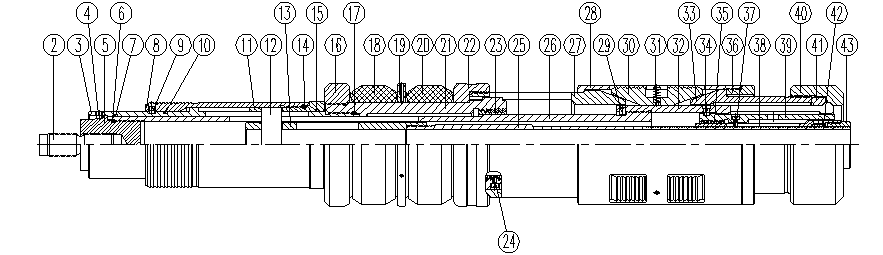
1.Screw Upper and Lower Equalizing Tubes together (item 33 and 34).
2.Screw Upper Ratchet (item 39) in end of Upper Body (item 6) until flush,(note:left hand thread) then screw in or out only enough to align slot in ratchet with pin hole in Body.Install Pin in body and slot of ratchet.
3.Install Equalizing Tube Assy. in top end of upper body.Slide Through until Tube Assy. Bottoms at Ratchet.
4.Install Ratchet Body (item 35) in Collet Support (item 38) Align slot in ratchet body with screw hole in collet support then install Socket Cap Screw(item 21).
5.Slide Ratchet Body/Collet Support Assy. over end of Lower Equalizing tube and far enough up so Lower Ratchet(item 36) and retainer (item 37) can be installed on Lower Equalizing Tube. Make up so that lower end of retainer is flush with lower end of equalizing tube.
6.Slide Collet Body (item 29) over Collet Support (item 38).Install Shear Screw (item 5) . Screw Collet Body to upper Body (item 6). This forces all inside components to their proper position inside the Upper Body. Install Socket Set Screw(item 23). Align all slots and temporarily install Crosslink (item 32) to keep components in position.
7. install Top Cone in Slip cage (item 22 and 24),Place Spring in pocket of Slip (item 25,26). place Slip in window of Slip Cage.Use #8-32 screw to hole slip in position. Install Bottom Cone and nut(item 27,28).
8.Slide Slip/Cone subassembly over Collet Body. Place Both halves of Split Ring(item 30) against upper bevel of collet fingers. Screw Collet Cover (item 31) to bottom cone. Remove Crosslink.
9.Screw Lock ring in Packing mandrel (item 17,20).Install Screw (item 21) in cut of Lock ring. Install O-ring (item 14),Gage Ring,Guide Ring,Packing Elements, and Spacers(item 15,16,18,19).
10.Install O-ring (item 8 and 9) on valve Body(item 7). Install O-ring (item 12,13) on Valve Cover(item 11). Slide Valve Cover on valve Body.
11.Screw Packing mandrel subassembly (item 15) to upper body far enough that upper Cone can be fully screwed to Guide Ring. Remove #8-32 screws from slip segments.
12.Screw upper Cone(item 22) to Guide Ring(item 16). Screw Valve Body(item 7) to Packing Mandrel.it will be necessary to screw the entire Valve Body/Packing Mandrel subassembly either down or up in order to align slots for installation of Crosslink. (item 32).
13.Install Fishing Neck(item 10) and Brass shear screw.(Item 5)
14.Install O-ring(item 4) on Top plug (item 30). Install release Stud (item 2). Screw top Plug into upper Body by using Vise Grip pliers and Gripping on end of release stud. Install Brass Shear Screw(item 5).
Disassembly is the reverse order of Above.