| |
Product
Part Number: |
Product
Description: |
Tech
Sheet
Number: |
|
051-5782-661
|
Packer,Repeata
C,7"26-29#,4.000"Seal Bore,Thermal Packer,Top Retrivable with Harris Crossober
|
051-5782-661
|
| Click
here for |
|
Assembly Instructions
|
|
|
|
|
Features/Description
Model Repeata-C Thermal Retrievable Production Packers are used for Steam Injection, testing, High Rate and high temp gravel packing and well screen applications as well as temporary bridge plugs. These wireline set packers are retrievable with tubing, sandline, electric wireline or coil tubing and require no rotation to release or set. The bi-directional one-piece slips hold high pressure differentials from either direction. Repeata-C packers use conventional permanent packer seal nipples and accessories. They are available for 3-1/2" through 9-5/8".
- Sets securely in any hardness casing, including premium
grades.
-
Temperature Rated to 600 Deg F at 1,800 PSI
-
Temperature Rated to 450 Deg F at 5,000 PSI
-
No rotation required to set or release
-
Composite Proven Retrievable Soft Set packing element system
-
Uses Composite Drillable Packer Seal Nipples and Accessories
-
Threaded pin down connection for easy installation of accessories, such as Screw-Out or Nok-Out Plug kits
-
Highly reliable and very popular Top Retrieving System as in all Repeata packers
-
Can be set with GO, Baker, or Gearhart wireline Setting Tools
-
Can also be set with our Crossover and Hydraulic Setting Tool or with your own style of crossover if you prefer
Operating
Instructions

Model Repeata C packer can be run with either Map, Gearhart or Baker pressure setting tools. The setting adapters contain Gearhart thread connections thus Baker adapter kits are required if a baker tool is used. The kit converts the lower end of the Gearhart tool to Baker tool connections.
- Screw the assy. setting kid (item 1) to left to Repeata C.
- Run the string to setting depth.
- Drap tripping ball.
Allow time for ball to gravitate to ball seat.DO NOT PUMP BALL TO SEAT.
- Pressure to
approximately 230 PSI and brass shear screw (item 4) will
fail allowing tool to stroke .Both chambers are effective.
- Pressure to approiximately
3700 PSI and packer shear stud or shear ring (48,000#) will fail. Packer is
now securely set. And stroke continuously, the tubing will drain though the
holes in cylinders (item 5 and 12) .
Running And Setting Packer
Model Repeata C packer
is run to setting depth in the same manner as a conventional drillable packer
or bridge plug. The packer components are shear pinned as a safety measure against
premature setting caused by well conditions. Line speed should not exceed 200
feet per minute while running. During setting there may be at least two kicks
shown on the weight indicator. One kick will indicate shear pins shearing and
the last kick will indicate the shear ring parting. After setting the packer,
pick up the setting tool a few feet then set back down and tag the packer to
assure the packer is in place.
Tubing retrieving procedures
To retrieve the Repeata C Packer, make up the model a or model b tubing retrieving tool assembly along with a 5 foot (or longer) production tube or tubing. Lower the retrieving tool until it latches over the retrieving neck of the packer. No tubing rotation is required for latching.
If differential pressures exist across the packer (as would be the case if the packer had an expendable plug or flapper valve in place) the pressure must be equalized before unseating the packer. Before latching onto the packer the production tube attached to the retrieving tool is used to expend the plug or open the flapper valve thus equalizing pressure.
Once the retrieving tool has latched into the packer, retrieval consists of pulling 7,000-11,000 lbs. up strain at the packer. This action releases the packer lock ring, which allows the packing elements to retract. Continued up strain will then pull the slips loose from the casing and into their retracted position.
The retrieving tool features a right hand release safety feature. Should the packer fail to release, the retrieving tool and tubing string can be recovered by taking a 5,000 lb. up strain and rotating right approximately 12 turns. This action frees the retrieving tool from the packer retrieving neck.
SPECIFICATIONS |
Casing |
Setting Range |
Repeata B Packer |
OD |
Weight
(T & C) |
Min
ID |
Max
ID |
Packer
Max
OD |
Seal
Bore |
Setting
Force
(Pounds) |
Max
Slip
Travel |
7" |
26-29# |
6.184" |
6.276" |
5.968" |
4.000" |
48,000 |
6.492" |
SEAL EQUIPMENT |
Chevron Seal Equipment
(Standard Packing) |
Double Seal |
Min
Bore |
Locator |
Type C Anchor Latch |
| |
|
3.00" |
Setting / Retrieving Equipment |
Wireline Setting Equipment |
Retrieving Tools |
Assy. Setting Kit
|
Wireline Setting Tool |
Model "B"
Tubing
Retrieving Tool |
MAP
Gearhart |
Baker |
|
|
3-1/2" OD* |
No. 20 |
|
* Item 2,3,4 and 5 in 066-5782-003 won't be used with MAP or Gearhart Setting Tools |
** The Sandline Retrieving Adapter is used in conjunction with Model "B" Tubing Retrieving Tool for sandline retrieving. |
Assembly Instructions
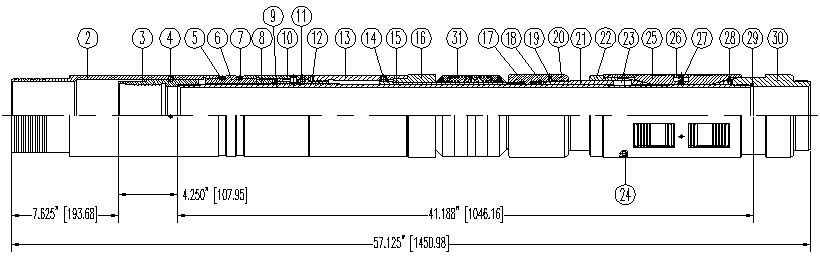
1. Spread Lock Ring (item 8) with screwdriver enough so it will pass over threads located at upper end of Body (item 9). Place Lock Ring immediately below threads. Do not engage Lock Ring with ratchet threads on Body.
2. Slip Tandem Sub (item 6)over upper end of Body.
3. Attach Latch Receptacle (item 3) to Body and make connection hand tight.
4. Slide Releasing Crossover (item 10) upward on Body from lower end of Body. Make up connection of Releasing Crossover to Tandem Sub wrench tight. Install set screw (item 7).
5. Install Pick-Up Sleeve (item 13) and make wrench tight to Releasing Crossover. Install set screw (item 12).
6. Slide upper end Packing Mandrel (item 15) inside Pick-Up Sleeve. Slide Upper Gage Ring (item 16) onto Packing Mandrel and make connection to Pick-Up Sleeve wrench tight. Install Shear Screw (item 14).
7. Install Packing Elements (item 31) on Packing Mandrel.
8. Install O-Ring (item 17) inside Lower Gage Ring (item 20). Screw Lower gage Ring to Packing Mandrel wrench tight.
9. Install Dual Packing (item 18) inside Lower Gage Ring.
10. Slide Nut (item 22) over upper end of Top Cone (item 21).Make Top Cone wrench tight to Lower Gage Ring. Install set screw (item 19).
11. Align slot in Top Cone with slot in Body. Install Key (item 23) in both slots.
12. Install Slip Springs (item 27) and Slips (item 25) in Slip Housing (item 26).
13. Screw Slip Housing to Nut (item 22) wrench tight. Rotate and align shear screw hole in Slip Housing with hole in Top Cone. Install Shear Screw (item 24).
14. Install O-Ring (item 29) inside Bottom Cone (item 30).
15. Screw Bottom Cone to Body (item 9). Make wrench tight by tightening Bottom Cone while holding back-uo wrench on Latch Receptacle (item 3). Install Set Screw (item 28) in Bottom Cone.
16. File away wrench marks on Latch Receptacle.
17. Connect Retrieving Neck (item 2) to Tandem Sub (item 6) wrench tight. Install Set Screw (item 5) and four Shear Screws (item 4). Assembly is now complete.
Disassembly of packer is accomplished by reversing steps listed above.